FABYAN MEDIA STUDIES A LEVELS
2022/2023
PRODUCT DEVELOPMENT
On this page, I will document my journey on how I develop my ideas into the film. I will also further elaborate on my production choices, styles that I'm going for as well as plot points on here.
SHOOTING SCHEDULE
I plan for at least only 2 days for shooting for 2 locations excluding re-shoots. The only time that I can shoot is only during weekends and because of the situation I'm in, it's going to be quite difficult as my band would be doing 2 gigs this month and we will be doing band practice every week, my actor Haris is also doing his own film and also there is going to be exam season soon next month. Man...
Location 1: At the Meragang Beach Cave at Sunday 10th July 2022 at 4:30 a.m.
I will shoot both the 1st scene and the projector footage there.
Location 2: At an empty room in Haris's house if possible the same day or next week at
anytime of day. I will shoot the scene where the protagonist enters the trance.
SHOOTING DAY 1
I was very nervous and stressed-out the day before. I anticipated that I would stand alone in the beach with no one coming as I asked them both to wake up at 4am. However, to my surprise, they both did wake up and got ready for me to pick them up. I made checklists to ensure that there would be nothing that I would forget. The props, equipment, screenplay and everything.
I got to the small pathway to the beach beside the road through thin jungle but the grass was too tall and my dad feared that something would be camouflaged in it so we opted to go to the cave from Meragang Beach. Unfortunately, the tide was very high and there was no way that we could walk on the beach to the cave.
Then, we chose to go to another beach nearby in Tanjong Batu.

mise-en-scene
Preferably, there wouldn't be any boats in the distance but I'm not God so nothing I can do about it.


Haris as Protagonist
Actually, Hadi wasn't supposed to come with a black shirt but I actually like it as it gives it a more obvious hint that Doppelganger isn't all good.

Hadi as Doppelganger
We started on surveying areas on where the sand has a little bit of grass in it and where there is no people cause there are a few on that day. After that, I gave a briefing to both of them on the screenplay, adjusted camera settings and readied the props.


Haris found it difficult to coordinate himself he was technically blinded by the mask as I didn't cut out any eye-holes [it didn't occur to me that they should see]. It resulted in his stiff movement in the film which I kind of like, gives it a cartoony feel.
some behind-the-scenes photos


Haris's wet sock
Hadi
Director's chair
Here is a photo I took with the camera and edited for fun to show what I want the film to look like.


Came home with a lot of footage this time compared to the magazine project.
We first film the 1st scene a few times, then filmed the dream sequence where Protagonist was lying down alone then the running around the beach one and filmed the part where he encountered the bottle.
Unfortunately, if videos are taken with my camera, the quality looks different from pictures as in there is a dip in quality and I'm not sure if that is natural. Nevertheless, I will have to edit the video footage to compensate for the quality drop and just settle with it. The 1st scene and the dream-sequences are done. The footage that came out was also different from the storyboard as to adjust to the mise-en-scene whilst keeping the concept true to the screenplay.
EDITING
I'm going to be using Adobe Premiere Pro for editing. I have little experience in Premiere Pro. The last time I touched it was earlier this year for a week and made a short skateboard compilation as my first project in Premiere. So, right now, I'm guessing that I need to rewatch the tutorials to get back the grip I had on the software.
opening of the opening
So, the procedure that I'm going for is 1st, I will view and check all the footage and choose which clips are the best. After that, I edit all the footage the same by cropping them, giving it a 4:3 aspect ratio so it looks more like a paint canvas. Next, is fixing the timing of the footage as in some of the footage, I panned the camera a little bit too fast. Then, I would go on to colour-grade it to get the look that I want as well as to compensate for the quality drop. Furthermore, I'm going to give effects on specific clips to which I see fit. Finally, I will compile all of them in chronological order.
1.

To start, I created bins for the footage, sound effects and music. I selected the 'in' point and 'out' point of the clips and made a sequence. I arranged it according to the screenplay. I replaced the tracking shot on the ground with just panning because I don't have a proper stabilizer and just used my hands to track and it wasn't smooth.
2.
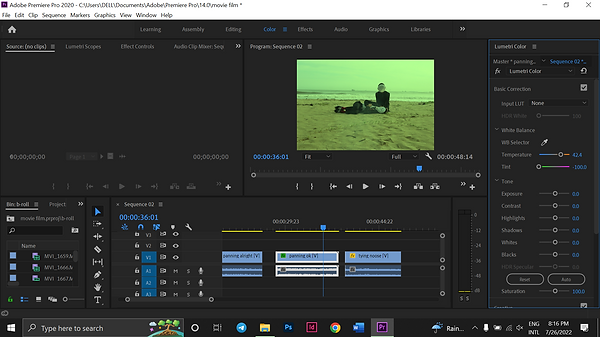
I proceeded to colour-grade the footage to make it look more green to make it ugly-beautiful if you know what I mean. I used green as it's quite close to the colour blue which is normally used to represent sadness in films. I made a gap so that the clip in the middle cuts to black and to the next scene as if there weren't that kind of transition, it would be too abrupt.
3.

After that, I duplicated the 2 clips and the top layer would have gaussian blue with blending mode 'lighten' to give it a bloom effect. The bottom clip I applied subtle noise to it so it looks more like film. Ignore the 1st clip named 'panning alright'. That was just for decision making for the camera panning scene.
4.

5.
Made a simple title card with the Franklin Gothic Heavy font.

6.
Added a small tagline under the main title.

7.
Added a cross dissolve to make the title card fade in.

The footage contains unwanted background noise such as me talking, people passing by, my footsteps and more. Because of that, I muted the audio track that contains the actual audio that came with the footage that I took. To add to that, is I want the sound of the waves to fade in when the screen is black before the title card fades in and to continue throughout the whole scene. So, I downloaded audio of waves from youtube.
8.

I proceed to make the title card a bit yellow to make it look old like an 80s title card.

9.
Then, I duplicated the layer and placed it on top. Put Gaussian Blur on the top layer and changed the blending mode to lighten to give it a glow.
1.

Next, is to edit the dream sequence footage to be played in a projector pointing at the Protagonist. Then, I can start filming at Haris's house.
dream sequence
I made a new project file to edit the footage for the dream sequence in. I skimmed through 8 minutes of footage and selected the parts I want included in the film. I arranged it according to the screenplay except I changed one part that is, the part where the Protagonist is lying in fetal position without Doppelganger is moved back earlier in the film as it flows better. It transitions into a black screen after that to show that the dream is also told in a non-linear narrative.
2.

I proceeded to crop the clips to make the whole opening fit the 2 minute duration of the film.
3.

Some shots are a bit too long, so I shorten it by a few % where the shots can be short yet unnoticeable that it's slowed down.
4.
Once I'm satisfied with the arrangement, some shots have black screens in between to signal that some time has passed to make the transitions less abrupt. The difficult part was making the black screen cut not too excessive and long so that the whole opening can fit 2 minutes.
5.

After that, I colour-graded all the footage to make it more vibrant to show that the Protagonist's fantasy/dream is where he wants to be.
6.

Once I'm satisfied with the arrangement, some shots have black screens in between to signal that some time has passed to make the transitions less abrupt. The difficult part was making the black screen cut not too excessive and long so that the whole opening can fit 2 minutes.
7.

I duplicated shots and layered it on top of different shots and changed it's blending mode to divide and difference to make it look like an intense dream. It is also to cover mistakes in my camera handling like when the camera strays too much from the Protagonist during the scene when he is running.
8.

I added cross dissolve to the shots layered on top for when the shots come on the screen to make it look smoother and not too abrupt. That's it for editing the dream sequence.
film poster
1.
Now, for the film poster to be edited in Photoshop.
I chose this picture to be turned into a poster. I colour-graded it by turning up the tint, saturation and the white and black values. Then, I duplicated the photo and added a gaussian blur for the top layer for and changed the blending mode to lighten for that glowing effect.
2.

I wanted to make an old-looking photocopy poster. So, I saved the project in no.1 as a jpeg and imported it to another project file. In that project file, I posterized and threshold the image.

3.
Next, I cut the image using the marquee tool into separate rectangles. It looks nice like that and gives the poster a bit more complexity while also hinting the divide between Protagonist and Doppelganger.
4.

I added strokes to the rectangles. After that, I added another image which is the paper cranes to fill up the empty space.
5.

I cut them using the wand and magnetic lasso tool. I separated them by selecting specific cranes and duplicating the using the marquee tool. Then, I deleted the original image.

6.
I positioned the cranes where it fits. Then, I used layered 2 grain filters and a stamp filter in the filter gallery. Then, I coloured it orange.
7.
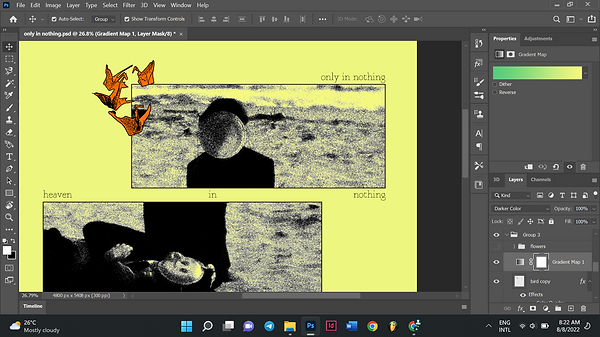
I added some text and a gradient map before I changed the background colour. It looked different before the background was yellow as when I merged the layers and saved it as a jpeg, it looked different and ugly so I had to figure something out.

8.
Before I try to figure that out, I structured the poster first. I added a scribble on the left mostly to fill up the empty space there but audiences can interpret it as how the Protagonist feels, torn and conflicted. I merged the layers so I can put a displacement map over the graphic to simulate photocopy paper. I also drew a little flower with my mouse to hint the item of significance in the film. I like how it looks like a child's drawing.
9.

I added a photocopy texture and changed the blending mode to hard mix and I really liked how it turned out. It's very distinct and it matches the heavy editing of the film while looking weathered and old.
10.

I made another variation of the poster just by adding another paper texture on top and set it's blending mode to difference and the colours look very nice.

SHOOTING DAY 2
This is the finished product.
Day 2 of shooting took place in 12th of August 2022 at Haris's house. For that day, I shot the scene where the Protagonist enters the trance. This time, it wasn't as stressful as the last day of shooting because it was more relaxed at his house.

mise-en-scene
However, the room that we were shooting in was very hot and humid. It was his aunt's old room. The upper floor of his house is semi-abandoned with no air-conditioner and the only thing to keep us from getting a heat stroke was a fan that is on the verge of breaking down. To add to that, I don't think old wooden houses are insulated and the weather was abnormally humid so I was dripping sweat and it's even worse for Haris as he needs to wear a suit. We had to clear the room because for some reason, there was laundry everywhere. I felt like I was violating her aunt because Haris refused to ask permission to film in there and insisted we wait for her to go out.
According to the screenplay, Haris has to lie down on a bed sleeping and there will be a projector shining on him projecting the dream sequence footage I had already edited from the beach.


This is me directing Haris on how to lie down.
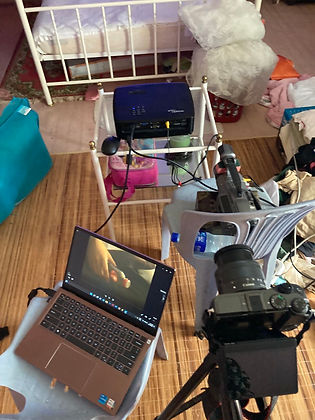
This is the equipment used to make the video feedback loop. To make the feedback loop, I borrowed a projector from school and connected my camcorder to it via RCA cable and pointed it directly at projected image.
Then, to show the dream sequence, I just changed the input source of the projector to HDMI that is connected to my laptop.
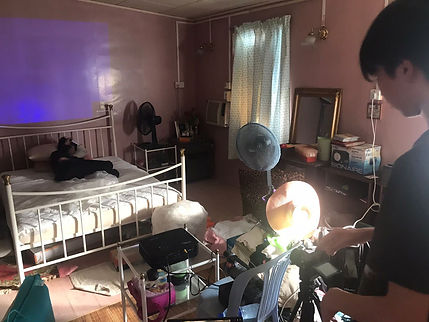
This is me filming.

These are random pictures I took when Haris was fooling around and it ended up looking good.


Came home with this much footage. Because it was too hot, I was afraid that Haris will get a heat stroke so we had to stop before I was completely satisfied with filming. Luckily, the footage I got was useable. I just wished I spent a little more time to perfect the composition and the camera settings.
EDITING
1.

I imported chosen clips in Premiere and arranged it. My tutor advised me not to show the dream sequence through the projector entirely like in the screenplay instead show a part of the dream through the projector and transition fully into the dream which actually is the better option. In the above picture, I added cross dissolve transition to some clips to make transitions more fluid and also to hide some mistakes in my filming.
2.

Some clips were too short and it wouldn't fit the pacing of the film so I adjusted the speed of some clips.

3.
After that, I maxed out the exposure of the footage so I can spot mistakes better. Next, I proceeded to adjust the positioning of the video so that it would look like one long take. Then, I re-adjusted the exposure to taste.
4.

The scene where the feedback loop starts as well as the start of the dream sequence looked too abrupt as it starts immediately. So, I put a posterize time effect on them so that it freezes for a bit and then starts.
5.

Then, I exported the dream sequence and re-imported it into the same project so it doesn't take time to render when I want to watch it while editing. I cut up and separated the video into separate scenes so I can edit each of them. Here, I will do the colour-grading. I maxed out the temperature so that it looks warm and not washed out. Then, I layered all the footage on top of each other. I added that gaussian blur on the top layer footage and changed the blending mode to lighten for that glow effect that I like. Next, I added noise for the bottom layer footage.
6.

After that, I put that footage together with the beach scenes and moved away the original pre-exported footage to the far right.
7.

Finally, I added a subtle static sound over the room scene then a song by Yabujin called Azeroy Garden 8888 during the dream sequence. It also kinda ties in the whole look of the film and coincidentally, Azeroy Garden is heaven in his musical lore. Then, I added exponential fade to the audio so that it blends smoothly to each other.
8.
This is everything put together.
POST - DISCUSSION
After viewing my film, my tutor recommended me to make some changes to my film. First, the title card should also have a thinner font and to add a cross dissolve transition at the end of the title card. He also told me to come up with a production house name and to straighten the 1st scene. Finally, this is my final piece.
For the film poster, he advised to just use the original image and just put the title on it and this is the final piece.
